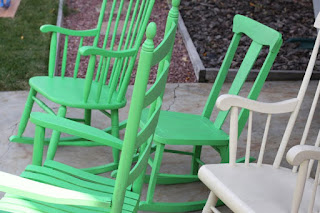
How To Paint A Rocking Chair | Step By Step Tutorial | Sanding | Without Sanding | Spray Paint
Step By Step Tutorial Of Painting A Rocking Chair
Do you want to give your cherished rocking chair a makeover? Painting your rocking chair is a great way to give it a new lease on life and refresh its appearance. This in-depth tutorial will take you step-by-step through the process of replacing any type of cushion—spring, seat, seat and back, or even one without—ensuring an exquisite finish that will have you rocking in style.
- Preparation is key
Thorough preparation is vital before commencing any painting project. First, take out any fabric covers or cushions from the chair. Using a light soap and water solution, thoroughly clean the chair's surface to get rid of any dirt, grime, or remnants of previous paint. Let the chair air dry fully before moving on.
- Sand it Down
Sand the rocking chair's whole surface with medium-grit sandpaper. In order to create a level and smooth surface on which the paint may stick, this step is essential. Any rough or uneven spots should receive extra attention, and sand the surface until it feels smooth to the touch.
- Prime Time
The chair has to have a layer of primer sprayed after it has been cleaned and sanded. Whether your rocking chair is made of plastic, metal, or wood, pick an expensive primer that is perfect for its material. Using a brush or roller, evenly apply the primer, being careful to cover the chair's whole surface. Primer guarantees a longer-lasting finish and improves paint adhesion.
- Choose Your Paint
Take into account the chair's material as well as your preferred style when selecting paint for your rocking chair. For wooden rocking chairs, acrylic or latex paint works well; speciality paint may be needed for metal or plastic chairs. Whether it's a striking statement colour or a soft neutral tone, choose a paint colour that goes well with your interior design and sense of style.
- Paint with Precision
Now that you have the primer and paint of your choice ready, let's get painting! Apply the paint to the rocking chair evenly using a brush or roller, making sure to use smooth, overlapping strokes. Make sure you cover every part of the chair, including the cushion, any springs, seat and back. To achieve full coverage, apply extra coats as needed after letting the initial coat dry fully.
- Final Touches
Examine the chair once the paint has dried to see if any places require touch-ups or further coats. When the covering is to your satisfaction, let the chair air dry fully before replacing the cushions or fabric covers. To further customize your rocking chair, now is an excellent time to apply any ornamental accents or finishes, including distressing or stencilling.
- Seal the Deal
You should think about using a clear sealer or finish to preserve and lengthen the life of your recently painted rocking chair. When your rocking chair is exposed to sunshine, this extra layer of protection helps shield the paint from fading wear and strain. Pick a sealer that works well with the paint you used, then apply it according to the manufacturer's directions.
Your outdated rocking chair may become a gorgeous focal point that brings charm and flair to any room by following these easy instructions. The technique is simple and satisfying whether you're painting the seat, seat and back, cushion, or a spring-loaded chair. Prepare to rock your way to a gorgeously refinished rocking chair by grabbing your paintbrush!
How to Paint a Rocking Chair Without Sanding?
Are you itching to paint your rocking chair but afraid of having to sand it first? Good news: painting a rocking chair without sanding is totally doable and still yields amazing results. This guide will teach you how to avoid sanding and still obtain a professional-looking finish on any type of furniture, including seats, seats and backs, cushions, and ones with springs.

- Clean Thoroughly
Start by giving the rocking chair a thorough cleaning to get rid of any possible dust, filth, or debris on the surface. Wipe down the entire chair with a light detergent and water solution, giving special attention to any really oily or filthy places. After cleaning, give the chair time to air dry thoroughly before continuing.
- Select the Appropriate Paint
When omitting the sanding process, choosing the appropriate paint is essential. Choose a premium paint that is made especially for the type of material—wood, metal, or plastic—that makes up your rocking chair. For most rocking chairs, acrylic or latex paints perform well and provide excellent coverage without requiring sanding.
- Prime (Optional)
Although it is usually advised for best paint adhesion, priming is not necessary if the sanding step is skipped. If you decide to prime, choose a primer that is appropriate for the material of your rocking chair and apply it as directed by the manufacturer. Although primer doesn't always guarantee a longer-lasting finish or improve paint adhesion, it can aid if time or supplies are limited.
- Apply the Paint
The chair needs to be painted after it has been cleaned and allowed to dry. Before using, give the paint a good stir to guarantee an even consistency. Apply the paint to the rocking chair evenly using a high-quality brush or roller, making sure to use smooth, overlapping strokes. Make sure you cover every part of the chair, including the cushion, any springs, seat and back.
- Several Coats
Applying multiple coats of paint may be necessary to achieve full coverage, depending on the colour and coverage of the paint you're using. According to the drying time recommended on the paint can, wait until each coat is totally dry before applying the next. Without sanding, this can take a little longer than usual, but the outcome will be worthwhile.
- Final Touches
After the last coat of paint has dried, examine the rocking chair to see if there are any spots that require more paint or touch-ups. When you're happy with the outcome, let the chair air dry fully before utilizing or putting it on display. For extra longevity and protection, especially if the chair will be used outside or in high-traffic locations, think about applying a clear sealer or finish.
You can avoid sanding and still have a nicely painted rocking chair that appears professionally done by following these easy steps. Your rocking chair will appear like new in no time at all if you use this quick and simple procedure to paint the seat, seat and back, cushion, or a chair with springs. Thus, without the need for sanding, grab your paintbrush and be ready to rock your way to a gorgeous change!
How To Spray Paint A Rocking Chair?
Spray painting your rocking chair can completely modify its appearance with a beautiful finish in a matter of minutes. Whether you want to give your favourite piece of furniture a makeover on the seat, seat and back, cushion, or a spring-loaded chair, this procedure can revitalize it. To attain professional results and take your rocking chair to new stylish heights, follow these detailed instructions.

- Preparation is key
Set up your workplace first. Select an area with good ventilation, ideally outside, to reduce odours and overspray. For paint splatter protection, place old newspapers or drop cloth down on the ground. To facilitate access from all directions, place the rocking chair on blocks or sawhorses, if at all possible.
- Clean the surface
Make sure no dirt, dust, or grease on the rocking chair could interfere with the paint's application. Wipe down the entire chair using a mild detergent and water solution, being sure to get into any cracks and hard-to-reach places. Let the chair air dry fully before moving on.
- Masking and Protection
Use painter's tape and plastic sheeting to cover any areas of the rocking chair that you do not want to paint. This covers any cloth cushions, metal hardware, or other ornamental pieces you wish to keep. Take your time in order to achieve minimal overspray and clean lines.
- Choose Your Spray Paint
Select a premium spray paint that is made especially for the material of your rocking chair. For increased coverage and longevity on wooden chairs, think about using a paint and priming mixture. Whether it's a matte, satin, or gloss finish, choose the one that best fits your preferred style. To guarantee that the paint is properly mixed, give the can a good shake for at least a minute.
- Practice makes perfect
To become comfortable with the spray pattern and pressure, practice spraying on a piece of cardboard or scrap wood before beginning on the rocking chair. Apply the paint in even, smooth strokes while moving the can steadily back and forth, keeping it 8 to 12 inches away from the chair's surface.
- Apply the Paint
Start painting the rocking chair after you feel confident using the spray technique. To guarantee even covering, begin at the top of the chair and work your way down, slightly overlapping each pass. Make sure the chair rotates to reach all angles and sides as needed. To avoid drips and achieve a smooth finish, use several thin layers as opposed to one thick coat.
- Allocate Time for Drying
As directed by the manufacturer, let the rocking chair air dry fully in between coats of paint. Depending on the paint and the surroundings, this could take 15 minutes to an hour. To avoid smudges or flaws, wait until the paint has completely dried before handling or moving the chair.
- Examine and Touch Up
After the last coat of paint has dried, thoroughly examine the rocking chair to identify any places that might require touch-ups or more paint. After smoothing out any rough edges or flaws using fine-grit sandpaper, apply touch-up spray paint as necessary. Take your time in order to achieve a perfect finish.
- Finish with a Clear Coat (Optional)
You may want to consider adding a clear coat sealer or topcoat to the painted surface of the rocking chair to give it more durability and protection. This will protect the paint from peeling, scratches, and UV rays and help seal it in, particularly if the chair will be used outside or in high-traffic locations.
- Put things back together and enjoy
After the paint and clear coat have dried completely, gently take off any masking supplies and put the rocking chair back together. Seize the opportunity to appreciate your labour of love and the way your worn-out, worn-out chair has been transformed into a gorgeous focus point for your room. Then, as you rock away in elegance, sit back, unwind, and enjoy the results of your effort.
You can master the technique of spray painting your rocking chair and create polished results that will surprise your guests and revitalize your room with these easy steps. Painting a seat, seat and back, cushion, or spring-loaded chair is just one of the many ways you may express your creativity and personalization with this adaptable approach. Now take your cans of spray paint and get ready to add even more beauty and elegance to your rocking chair!
Frequently Asked Questions (FAQs) About Rocking Chairs
- What are the Benefits of Using a Rocking Chair?
Beyond just being a place to unwind, rocking chairs provide other advantages. They can aid in reducing stress and anxiety and encourage improved posture and calming movements. Furthermore, rocking rockers are frequently used in nurseries to lull infants to sleep.
- How Do I Choose the Right Rocking Chair for My Needs?
Size, design, and material are important considerations when choosing a rocking chair. Select a chair with a style that goes with your decor that is constructed of sturdy materials like metal or wood. Make sure the chair fits your body properly and provides enough support for you to rock in comfort.
- How Can I Maintain My Rocking Chair for Longevity?
To make sure your rocking chair lasts for many years, proper upkeep is essential. To get rid of filth and debris, clean the chair on a regular basis with a water and mild detergent solution. Look for any loose nuts or screws and tighten them if necessary. If the wood used to make your rocking chair is exposed to the outside, you might want to consider using a protective coating.
- Can I Paint or Refinish My Rocking Chair?
Yes, it is possible to give your rocking chair a new look by painting or refinishing it. Make sure the chair is clean and clear of grease and grime before painting. Paint adhesion can be improved by lightly sanding the surface. For optimal effects, use a premium paint or stain that is appropriate for the material of your rocking chair and apply it evenly.
- Are Rocking Chairs Suitable for Outdoor Use?
There are rocking chair models made especially for outdoor use, even if the majority are intended to be used indoors. Seek rocking chairs composed of weather-resistant materials that can tolerate exposure to dampness and sunlight, such as teak or polyethene. To increase comfort and protection, think about putting on coverings or cushions.


Comments
Post a Comment