How To Make A Side Table | Making A Stylish Side Table With Storage Out Of Pallet Wood
Making A Stylish Side Table With Storage Out Of Pallet Wood
When it comes to do-it-yourself furniture projects, making a side table out of pallet wood offers an option to combine both beauty and practicality. Not only can it give your living area a hint of rustic appeal, but including storage in the design maximizes its usefulness. Come along as we walk you through the process of building your own side table out of repurposed pallet wood, complete with storage sections.
- Step 1: Source Your Pallets
The pallets themselves are, of course, the foundation of any pallet wood project. Look for strong pallets that are in good shape and aren't damaged or rotted. Pallets are frequently available for free from nearby companies, warehouses, or recycling facilities.
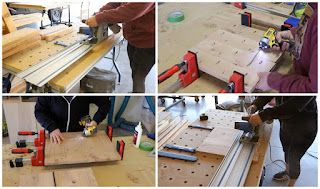
- Step 2: Disassemble and Prepare the Wood
Dismantle the pallets carefully, keeping the wood slats that can still be used and chucking away any broken parts. It's time to get your pallet wood ready for building once you have it. To make your side table smooth, sand down any sharp edges and take out any staples or nails.
- Step 3: Design Your Side Table
Spend some time designing your side table before starting to build it. Take into account the measurements, which include the depth, width, and height, in addition to the arrangement of the storage spaces. This planning phase will guarantee that the finished product satisfies your functional and aesthetic needs.
- Step 4: Cut and Assemble the Components
Start by cutting the pallet wood to the appropriate sizes for the different parts of your side table, using your design as a reference. The tabletop, legs, and storage sections might be examples of this. After cutting, put the parts together with wood glue and screws, making sure that everything is firmly connected.
- Step 5: Incorporate Storage Features
Include storage sections in the design of your side table to optimize its usefulness. This could be making a hollow centre for larger goods, putting drawers into the side or front panels, or even putting shelves underneath the surface. Use your imagination to come up with storage options that work for you.
- Step 6: Finishing Touches
It's time to give your side table the final touches now that the building is complete. To protect the wood from deterioration and to improve its aesthetic appeal, apply a layer of paint or stain. In order to give your creation a unique touch, think about using decorative hardware, like knobs or drawer pulls.
- Step 7: Enjoy Your Handcrafted Side Table
Your side table is ready to be placed in your home once the finish has cured. Enjoy the satisfaction of turning pallet wood into a useful piece of furniture with storage while you admire the beauty of your personal masterpiece.

Types of Side Tables
- End tables
End tables provide a handy surface for snacks, drinks, or reading materials. They are usually positioned close to a sofa or armchair. They are available in a range of sizes and forms, such as square, rectangular, and circular.
- Bedside tables
These are little tables that are positioned next to beds to provide room for reading materials, lamps, and personal belongings. Drawers on bedside tables are a common feature for extra storage.
- Console Tables
Perfect for hallways or entryways, these tables are usually slimmer and longer than other side tables. In living areas, console tables can also be used as side tables.
- Nesting Tables
Sets of two or more tables that may be nested or stacked together make up nesting tables. They offer versatile space arrangement possibilities and can function as standalone tables as required.
Key Features
- Storage Options
Drawers, shelves, and cabinets are common ways that side tables add more storage. These features can keep necessities close at hand and aid in decluttering your living area.
- Materials and Finishes
Side tables come in a range of materials, such as acrylic, glass, metal, and wood. The material selection has an impact on the table's appearance, toughness, and upkeep needs. Finishes like paint, stain, or lacquer can protect the surface of the table while improving its beauty.
- Style and Design
Side tables are available in a variety of styles, ranging from modern and minimalist to conventional and classic. Select a look that expresses your individual taste and blends well with the décor you already have.
- Size and Scale
Take into account the side table's dimensions in relation to the adjacent furnishings when choosing one. To create visual harmony, a side table should be proportionate to the couch, armchair, or bed it is placed next to.
Placement and Function
- Living Room
Position side tables between armchairs or at either end of the sofa in the living room. They enhance the aesthetics of the space and offer a practical surface for food, drinks, and remote controls.
- Bedroom
Bedside tables are necessary to store personal belongings, books, and lamps in the bedroom. To optimize storage, select tables that have shelves or drawers.
- Entryway
You can use a console table there to store mail, keys, and other goods. It can serve as a decorative element to welcome visitors as well.
Tips for Choosing the Right Side Table
- Think About Functionality
Choose a side table based on your demands for surface area and storage by considering how you intend to utilize it.
- Fit Your Personality
Choose a side table that blends in with the room's overall design and colour palette.
- Calculate the Area
To make sure the side table fits comfortably without taking up too much room, measure the area before placing it there.
- Verify the Height
For a unified appearance, the side table's height should correspond to the sofa or bed it complements.
Making a side table with storage out of pallet wood is a useful addition to any living area in addition to being a gratifying do-it-yourself project. You can make a one-of-a-kind piece of furniture that matches your style and fulfils your storage needs by following these instructions and letting your creativity run wild. Now get your tools together, put on your work gloves, and let's start this woodworking project!


Comments
Post a Comment