How To Build A Picnic Table | Out Of Pallet Wood | That Folds Into A Bench | With Separate Benches
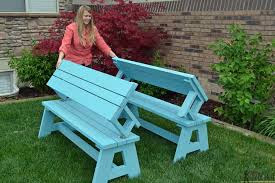
Building A Versatile Picnic Table from Pallet Wood that Folds into a Bench
Hello outdoor lovers and homeowners! You're in for a treat if you're looking for an affordable, customizable way to improve your outdoor experience. Today, we're going to set out to build a useful picnic table out of pallet wood that also happens to be a comfortable bench. This project will add rustic charm and practicality to your home, as well as elevate your outdoor parties. Let's get started and let your inner carpenter loose!
Materials Needed
Before we begin, let's first of all gather our materials:
- Pallets (in good condition and preferably heat-treated for safety)
- Saw (Circular saw or hand saw for cutting pallets)
- Drill and screws (For assembly)
- Sandpaper (To smoothen rough edges)
- Paint or wood stain (Optional for customization)
- Measuring tape and pencil (For precise measurements)
Step 1: Disassemble and Prepare the Pallets
Dismantle the pallets with caution so as not to harm the wood. Take out any staples or nails, then look for any flaws. After the pallet wood has been deconstructed, measure and cut it to the correct measurements for the table and bench.
Step 2: Construct the Tabletop and Seats
Assemble the tabletop by positioning the chopped pallet wood pieces side by side. Screws are used to hold them together and create a strong structure. Likewise, build the seats by arranging and securing the pieces of pallet wood so that they resemble benches.
Step 3: Create the Folding Mechanism
Install hinges at key locations where the tabletop joins the chairs to enable the picnic table to convert into a bench. To enable effortless folding and unfolding, make sure the hinges are functioning properly and aligned.
Step 4: Sand and Finish
Sandpaper can be used to smooth down any uneven surfaces or sharp edges to avoid splinters and guarantee a polished look. Apply paint or wood stain, depending on your desire, to improve the wood's appearance and shield it from the weather.
Step 5: Test And Have Fun
Check the freshly constructed picnic table and bench's usefulness when the building is finished. To guarantee seamless transitions between the two shapes, fold and unfold it. Organize a fun outdoor get-together with your loved ones and enjoy the thrill of creating your own DIY masterpiece!
In conclusion, bravo for creating your own picnic table out of pallet wood that can be easily converted into a bench! This adaptable addition to your outdoor area offers a sense of rustic elegance along with useful seats. Please feel free to alter it further to suit your tastes and express your originality. Keep checking back for additional DIY projects that will inspire you as you continue to use your skill and imagination to improve your outdoor experience.
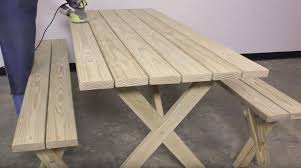
How To Build A Picnic Table With Separate Benches?
For many people, having a leisurely picnic in the great outdoors is a treasured activity. And a handmade picnic table is the ideal way to enhance this experience. We'll lead you through building a classic picnic table with individual benches in this in-depth guide. This do-it-yourself project will enhance the usefulness and charm of your outside area, making it ideal for family get-togethers, backyard cookouts, or peaceful outdoor meals.
Materials Needed
Before we begin, gather the following materials:
- Lumber (Pressure-treated pine or cedar for durability)
- Screws (Exterior-grade screws for outdoor use)
- Drill and drill bits
- Saw (Circular saw or handsaw for cutting lumber)
- Measuring tape and pencil
- Sandpaper or electric sander
- Wood stain or outdoor paint (Optional for aesthetics and protection)
Step 1: Design Planning
Determine the size of your picnic table and benches first. Think about how much room you have outside and how many guests you plan to serve. Make a design layout and record the dimensions of the tabletop and benches.
Step 2: Cutting the Lumber
Divide the lumber into the following parts using the dimensions found in your design plan:
- Tabletop: Multiple shorter pieces for width and two long ones for length.
- Bench Seats: Multiple sections that correspond to the tabletop's breadth.
- Legs and Supports: Two legs for each bench and four for the table, plus sections of support joining them.
Step 3: Assembly
Screws are used to join the longer-length parts of the tabletop to the shorter-width pieces. Make sure the parts are firmly attached and evenly spaced. Then build the bench seats similarly, lining up and fastening the wood pieces together.
Step 4: Building the Frames
Attach the legs to the tabletop and bench seats, respectively, to create the table and bench frames. To stabilize and strengthen the structure, use support pieces. To guarantee correct alignment, double-check the dimensions and angles.
Step 5: Finishing Touches
To get a smooth finish, sand down any uneven areas and edges. Applying wood stain or outdoor paint will improve the look and keep the wood from deteriorating. Before arranging the picnic table and benches in your outdoor area, make sure they have had enough time to dry.
Step 6: Enjoying Your Creation
When everything is finally put together, take a seat, unwind, and enjoy your beautifully constructed picnic table with individual seating. Gather your loved ones to participate in the outdoor experience and make enduring memories with this handcrafted centerpiece.
In conclusion, building a picnic table with distinct seating is a useful addition to any outside space in addition to being a pleasant do-it-yourself job. With a little imagination and these detailed directions, you can design a room that's both practical and welcoming for outdoor parties and relaxing times. With this timeless addition, you can fully enjoy the craftsmanship and make the most of your outdoor haven. Have fun constructing!


Comments
Post a Comment